
Server-Free Web Map Tile Generation
Recently at Stamen and thanks to a grant from the John S. and James L. Knight Foundation, we’ve been experimenting with a new way of generating raster map tiles using AWS Lambda with open source GIS software. If you haven’t heard of, or aren’t familiar with AWS Lambda:
AWS Lambda lets you run code without provisioning or managing servers. You pay only for the compute time you consume — there is no charge when your code is not running. With Lambda, you can run code for virtually any type of application or backend service — all with zero administration. Just upload your code and Lambda takes care of everything required to run and scale your code with high availability. You can set up your code to automatically trigger from other AWS services or call it directly from any web or mobile app.
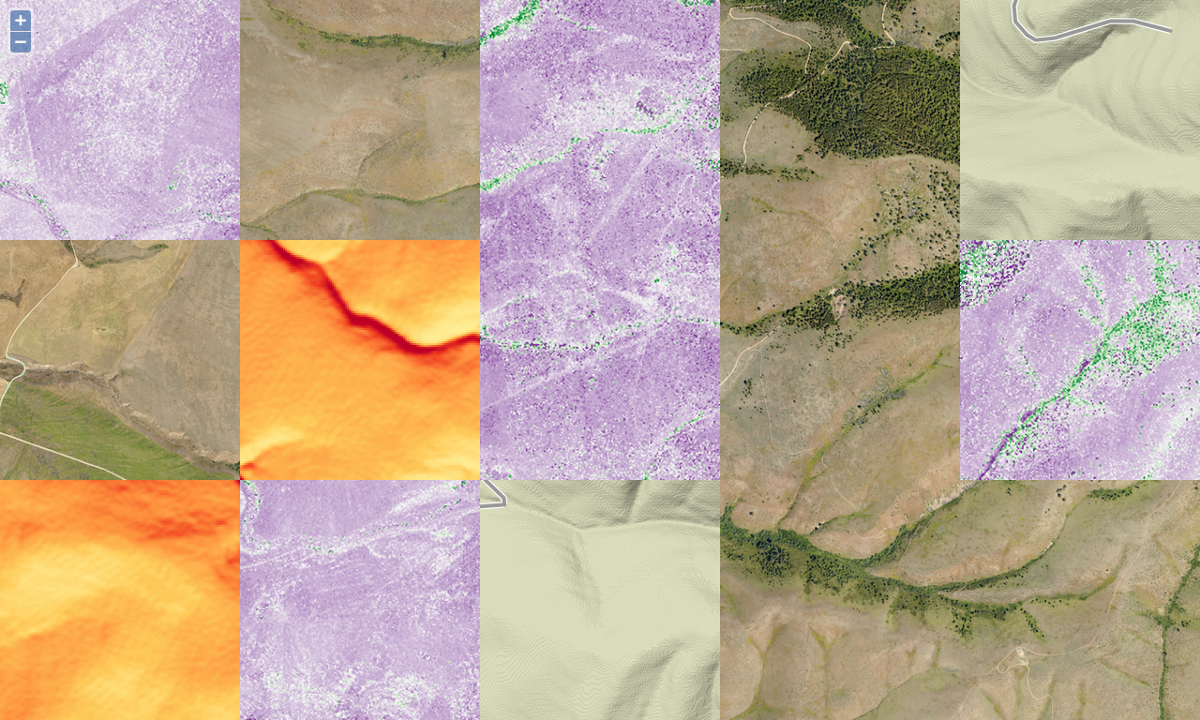
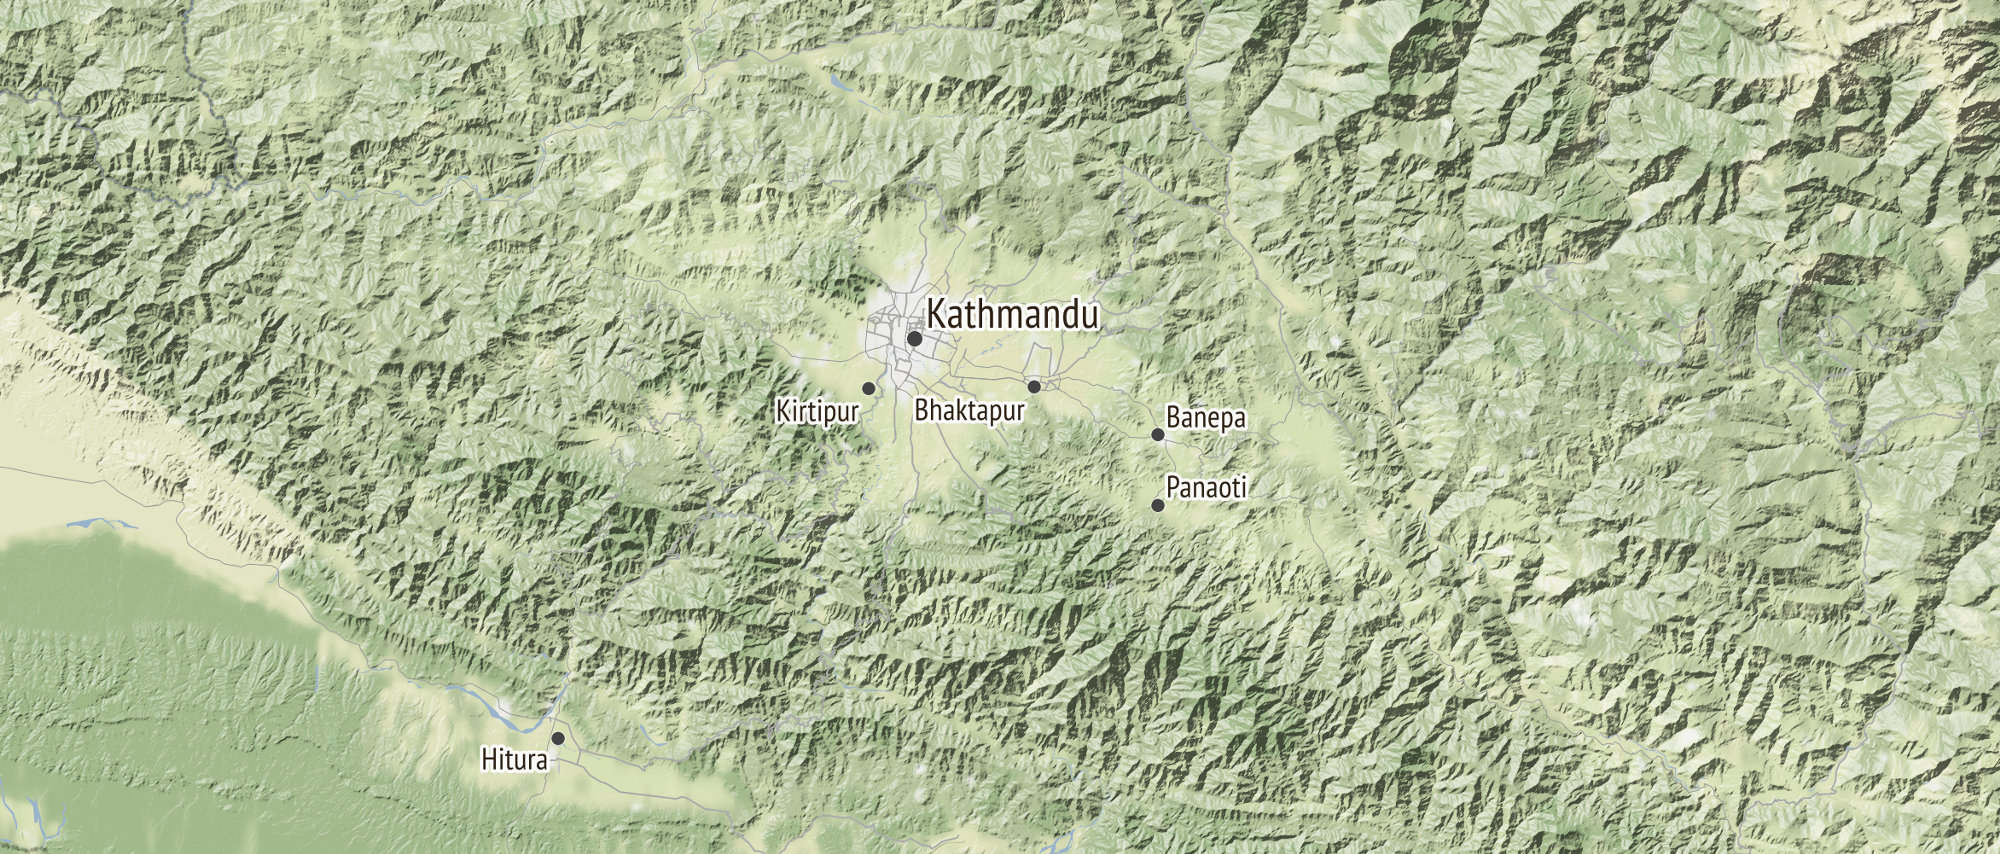
Some of the benefits of using AWS Lambda are that you have no tile server to maintain, it’s cost efficient to run, and that it can scale up as well as down. We’ve found that this process works well for tiling raster data from hillshades, aerial imagery, and landcover; as well as vector data via sources such as OpenStreetMap and Natural Earth. As such it can be applied to a wide range of use cases. This method was and is continuing to be developed by Seth Fitzsimmons, formerly Stamen’s Director of Technology. Since first applying it to power our latest global map tiles, Terrain Classic, he has applied it to other projects such as OpenAerialMap and Portable OpenStreetMap, as the POSM Imagery API, intended for use with UAV imagery processed through OpenDroneMap.
In this post I’ll explain how we implemented this process so that you can replicate it to create raster tiles from your own GIS raster data. In a future post I’ll describe how to implement it for creating map tiles from vector data. If you’re following along it’s recommended that you have knowledge of the command line using Bash, how “slippy maps” work, and general concepts of geospatial data processing.
Warning: this post is fairly technical and there are lots of places for things to go wrong, so it will likely take some patient experimenting and debugging to replicate.
Tech Stack
You’ll need to have an activated AWS account as we’ll be using the following AWS services:
Note 1: In this context we use EC2 to speed up the processing of large (typically 9-10+ GB in size) raster data files. In a short amount of time you may spin up an Ubuntu server on EC2, install GDAL, process your data, copy it to S3, and then shut down the server when not using it to avoid incurring additional costs.
Note 2: It’s necessary to have the AWS CLI tools installed locally and on your EC2 server if you’re using one. They can be installed using Python’s pip by doing: pip install awscli.
Additionally we’ll be using the following:
Note 3: Lambda functions are executed within an Amazon-provided runtime, similar to a Heroku dyno build on their Cedar stack. To provide additional libraries, e.g. GDAL or Python modules, they need to be compiled in a matching environment and included in the source archive, which is where Docker comes in. Apex enables CLI tools for creating, deploying, and managing Lambda functions.
The code examples I’m referring come from Seth’s OpenAerialMap Dynamic Tiler GitHub repo, so be sure to take a peak at, download, or clone it.
AWS Credentials
IAM is how you organize and handle users and permissions across various AWS services such as Lambda and S3. If you don’t already have an IAM user on your AWS account you’ll need to create one, download the credentials (access id and secret key), and make sure the user has the necessary permissions (aka Policy) to make changes to your AWS account. See the AWS documentation on creating IAM users for more info.
You’ll need to make sure that your AWS Credentials (id and secret key) as well as your S3 bucket name are exposed as environment variables in Bash. One method to accomplish this is to create a local .env file in the directory where you’ll be executing AWS commands. Seth has made a template of this file: you may copy and then alter the sample.env from the OAM Dynamic Tiler repo with your credentials as follows:
cp sample.env .env && vim .env
At Stamen we manage multiple AWS accounts for different clients, so I find this method of keeping credentials in a project specific .env file simpler to manage than manually resetting the global AWS CLI credentials each time I switch projects that use AWS. WARNING: If you are using Git / Github, make sure to not commit your .env file by listing it in .gitignore.
You can then use a tool like Foreman to run aws commands so that the environment variables can be recognized, e.g.:
foreman run \
  aws s3 cp source_file_name.tif \
  s3://your-s3-bucket-name/sources/source_file_name.tif \
--acl public-read
Direnv is an alternative tool that may be used for managing local env variables.
Apex recommends using “profiles” (in ~/.aws/config) to allow multiple IAM users to be used for different purposes.
The remaining commands that involve environment variables for AWS assume they are accessible in your working environment. You may find more info on the AWS CLI tool kit in their documentation.
Raster Data Processing
When processing raster data for use with the AWS Lambda Tiler the main steps are to:
- Determine the maximum zoom level and bounding box of your data set, based on its resolution
- Make the data “tile friendly”
- Create overviews of the source data
- Create a warped VRT in Web Mercator that points to your source data
- Create a metadata JSON file
- Move source data, metadata, and VRT to a S3 bucket sub directory
The following commands relate to the OAM Dynamic Tiler repo mentioned above.
First, take a look at your raster data to determine its geographic extent. The data I’m using is a high resolution aerial imagery GeoTiff that happens to be in the UTM Zone 11N / EPSG:26911 Coordinate Reference System:
$ gdalinfo source_file_name.tif
...Upper Left ( 724763.519, 5181013.481) (114d 3'26.94"W, 46d44'41.37"N)
Lower Left ( 724763.519, 5171329.376) (114d 3'43.96"W, 46d39'28.05"N)
Upper Right ( 733018.570, 5181013.481) (113d56'58.43"W, 46d44'31.19"N)
Lower Right ( 733018.570, 5171329.376) (113d57'16.08"W, 46d39'17.90"N)
Center ( 728891.044, 5176171.428) (114d 0'21.35"W, 46d41'59.68"N)
To convert these coordinates into a WGS84 bounding box (for use in index.json as BBOX), run them through gdaltransform, e.g.:
$ gdaltransform -s_srs EPSG:26911 -t_srs EPSG:4326
724763.519, 5181013.481
-114.05748235326 46.7448262229288 0
We can now make a copy of the source data to be more “dynamic-tiling-friendly.”™ We do this by creating internal tiles via gdal_translate with the TILED=yes config flag, setting our BLOCKSIZE to 512, and setting compression appropriately. In this case we are using DEFLATE compression type withPREDICTOR=2 aka “Horizontal Differencing Predictor”, which works well for data types that have either 8, 16 or 32 bit samples. The transcode.sh script will run this command for you.
gdal_translate \
  -co TILED=yes \
  -co COMPRESS=DEFLATE \
  -co PREDICTOR=2 \
  -co BLOCKXSIZE=512 \
  -co BLOCKYSIZE=512 \
  -co NUM_THREADS=ALL_CPUS \
  input.tif \
  output.tif
To prepare rasters for dynamic tiling, overviews need to be added. This is important so that lower zoom levels don’t pull the full resolution data. As this process takes some time, you may want to spin up an AWS EC2 instance with adequate disk space (32GB should do for a 10GB file) and run GDAL there, as it will be much quicker to copy to/from S3.
To figure out which overviews to build, run get_zoom.py on the source file or assume that its resolution makes sense to display up to some zoom level.
$ get_zoom.py source_file_name.tif
20
Alternately, just build some overviews and assume that they’ll be enough. The following example will render from z5 on a z20 source (each overview level corresponds to 1 zoom), which is sufficient on a ~10GB file:
$ gdaladdo \
  -r cubic \
  --config GDAL_TIFF_OVR_BLOCKSIZE 512 \
  --config TILED_OVERVIEW yes \
  --config COMPRESS_OVERVIEW DEFLATE \
  --config PREDICTOR_OVERVIEW 2 \
  --config BLOCKXSIZE_OVERVIEW 512 \
  --config BLOCKYSIZE_OVERVIEW 512 \
  --config NUM_THREADS_OVERVIEW ALL_CPUS \
  -ro \
  source_file_name.tif \
  2 4 8 16 32 64 128 256 512 1024 2048 4096 8192 16384 32768 65536
Note that depending on your data type you may want a different resampling algorithm. In the command above we are specifying cubic which works well for aerial imagery. However if you are using a dataset with classified values, such as MODIS land cover (which Terrain Classic uses as its primary land cover source), you may want to use nearest. This answer on GIS.StackExchange does a good job of describing different resampling algorithms in the context of spatial data.
To create a warped VRT for use with the Lambda function, use gdalwarp with -of VRT. The -te (target extent) parameter corresponds to the extent of the world in web mercator (so coordinates are consistent across sources). -ts (target size) corresponds to the pixel size of the world at zoom 20 (or whatever MAX_ZOOM is set to for a given function). Keep in mind that if you are working with a RGB raster that already has an alpha band, then you’ll want to leave out the -dstalpha flag.
$ gdalwarp \vsistdout
/vsicurl/http://your-s3-bucket name.s3.amazonaws.com/sources/source.tif \
\
-t_srs EPSG:3857 \
-r cubic \
-overwrite \
-of VRT \
-te -20037508.34 -20037508.34 20037508.34 20037508.34 \
-ts 268435456 268435456 \
-dstalpha
Fortunately Seth wrote some scripts to help automate “tile-friendly-ifyng” the data, creating the overviews, warped VRT, and JSON metadata. You would run them like so in the following order:
# make a dynamic tiler friendly copy of the source data
# (assuming the source file is located on S3)
$ ./transcode.sh \
  http://your-s3-bucket-name.s3.amazonaws.com/source_file_name.tif \
  source_tiled.tif
# create overviews
$ ./make_overviews.sh source_tiled.tif
# copy source and overviews to S3
$ aws s3 cp \
  source_tiled.tif \
  s3://your-s3-bucket-name/sources/source_file_name/index.tif \
  --acl public-read
$ aws s3 cp \
  source_tiled.tif.ovr \
  s3://your-s3-bucket-name/sources/source_file_name/index.tif.ovr \
  --acl public-read
# generate warped VRT and copy to S3
$ id=source_file_name; ./get_vrt.sh $id | aws s3 cp - \
  s3://your-s3-bucket-name/sources/${id}/index.vrt \
  --acl public-read
# generate metadata JSON and copy to S3
$ id=source_file_name; python get_metadata.py $id | aws s3 cp - \
  s3://your-s3-bucket-name/sources/${id}/index.json \
  --acl public-read
Note the --acl public-read flag in the above aws s3 cp commands. This sets permissions for public reading of the output file which is necessary for Lambda functions to read from S3 .
If we were to ls the sources/source_file_name directory on our S3 bucket after this process we would see that it contains index.tif, index.tif.ovr, index.vrt, and index.json files.
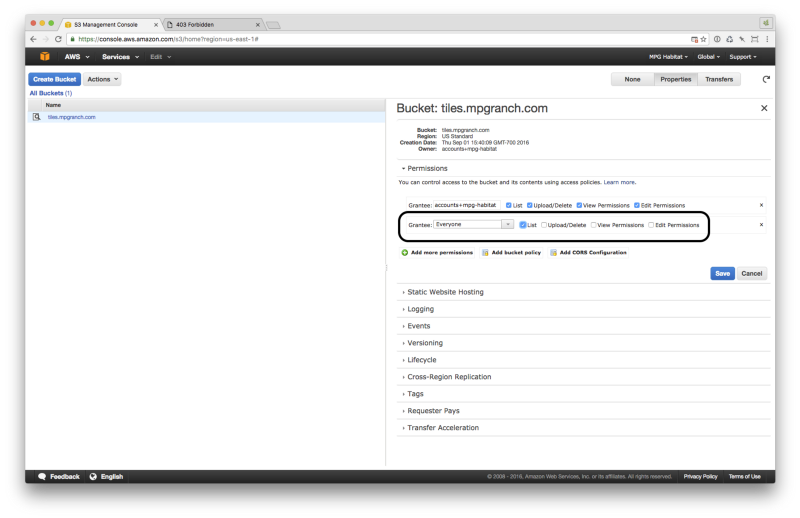
S3 Bucket Configuration
Before we move on to creating the necessary IAM Roles and Policies, make sure you have created an S3 bucket and that it is configured correctly. Here’s a screenshot of a sample S3 bucket’s properties showing permissions set so that files can be read by “everyone”. The relevant area is circled in black.
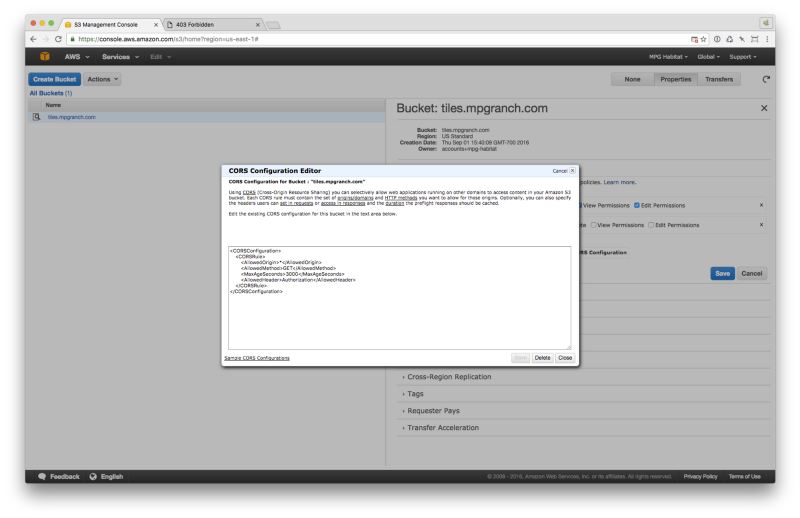
You’ll want to make sure that you have CORS configuration as follows:
Configure IAM Roles & Policies
Now that the S3 bucket is created, we’ll go ahead and set up the IAM roles and policies which will give the necessary permissions for Lambda to run code that generates our tiles and writes them to our S3 bucket.
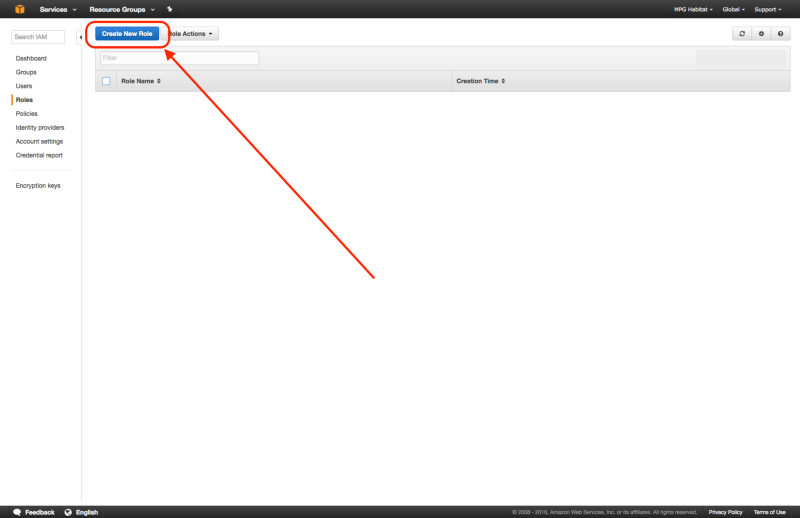
1. Create IAM Lambda Role
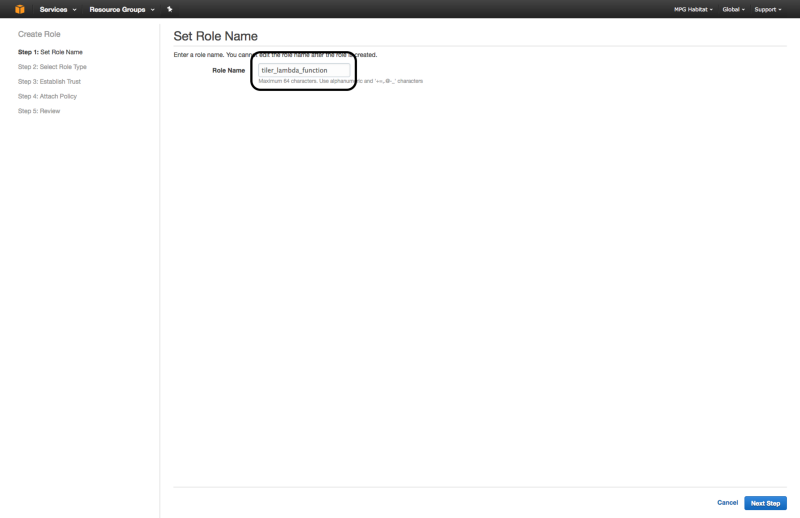
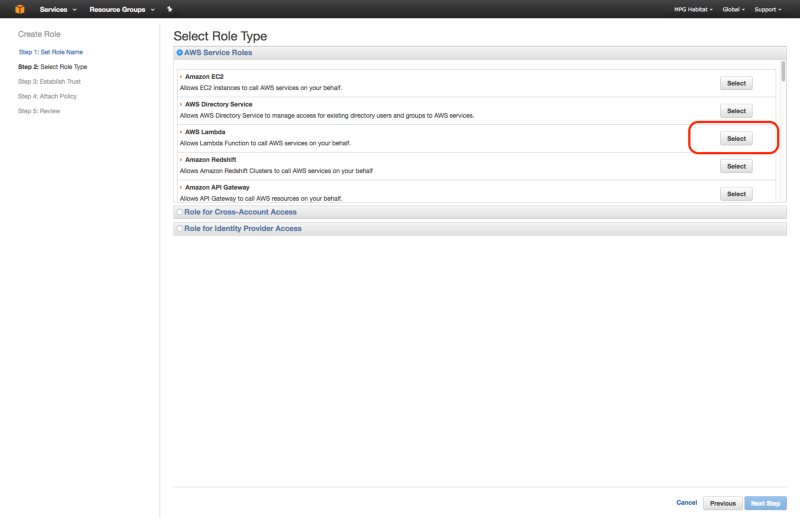
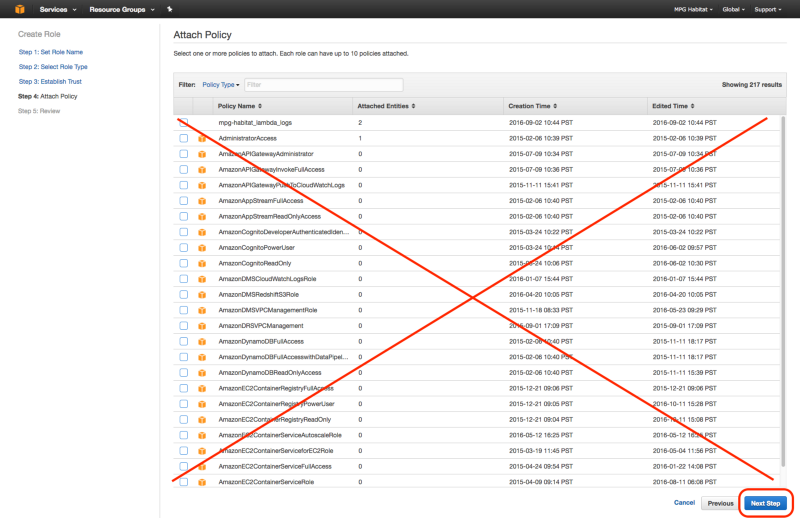
From the IAM Management Console, create a IAM role by clicking the “Create New Role” button. Call it tiler_lambda_function, choose the role type AWS Lambda, and don’t attach any additional policies in step 4.
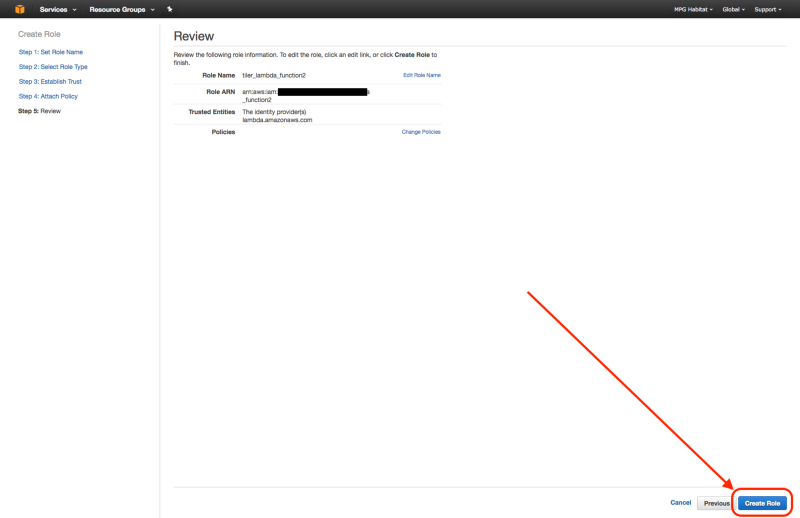
After creating the role, if you view the “Trust Relationships” and click on “Edit Trust Relationship”, you should see the following:
{
  "Version": "2012-10-17",
  "Statement": [
    {
      "Effect": "Allow",
      "Principal": {
        "Service": "lambda.amazonaws.com"
      },
      "Action": "sts:AssumeRole"
    }
  ]
}
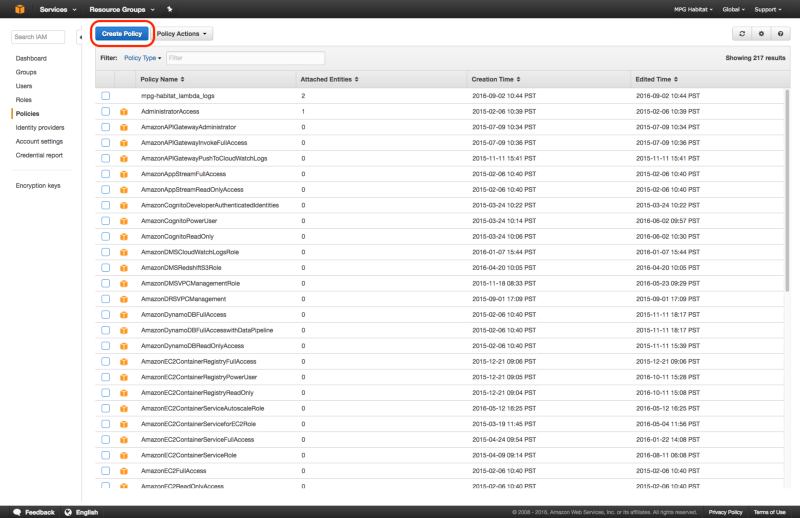
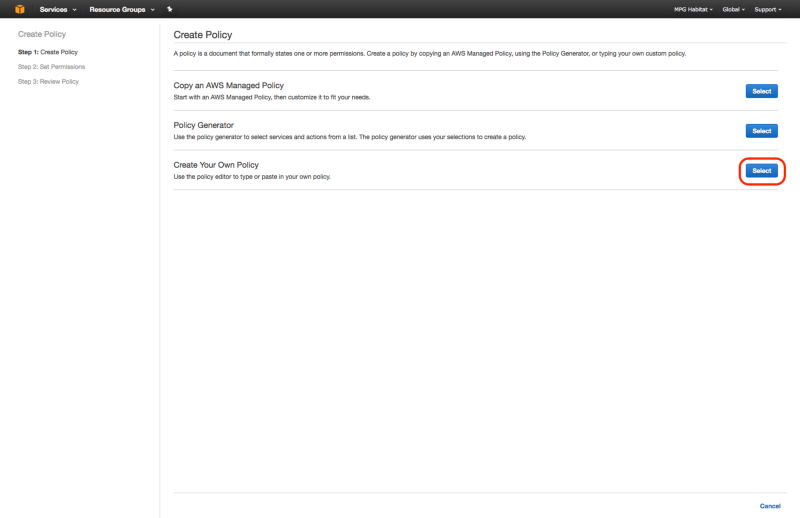
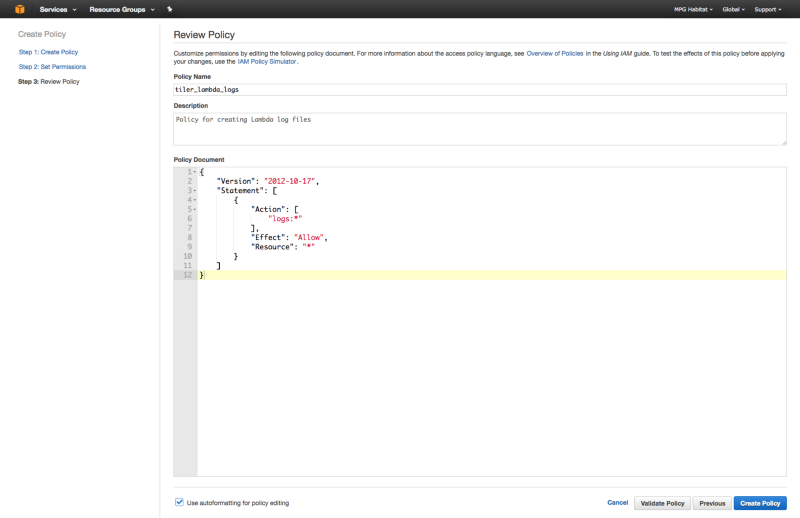
2. Create IAM Policy tiler_lambda_logs
Next, create a custom IAM policy called tiler_lambda_logs with the following policy document:
{
    "Version": "2012-10-17",
    "Statement": [
        {
            "Action": [
                "logs:*"
            ],
            "Effect": "Allow",
            "Resource": "*"
        }
    ]
}
This can be done as follows:
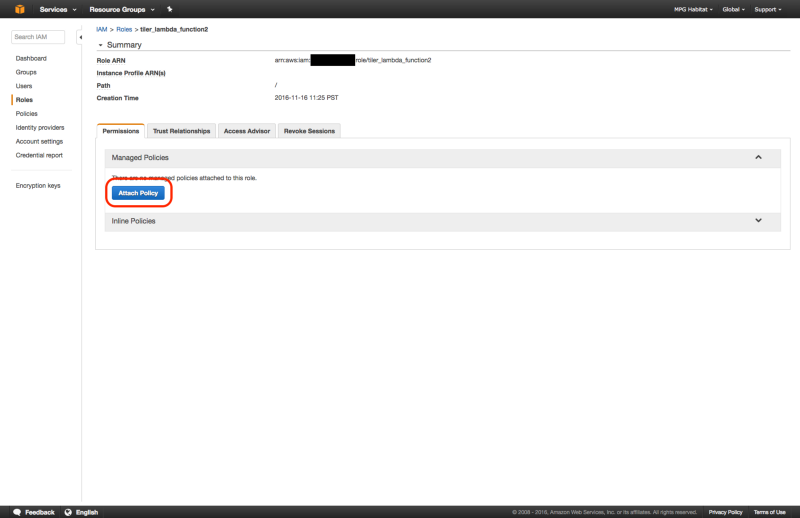
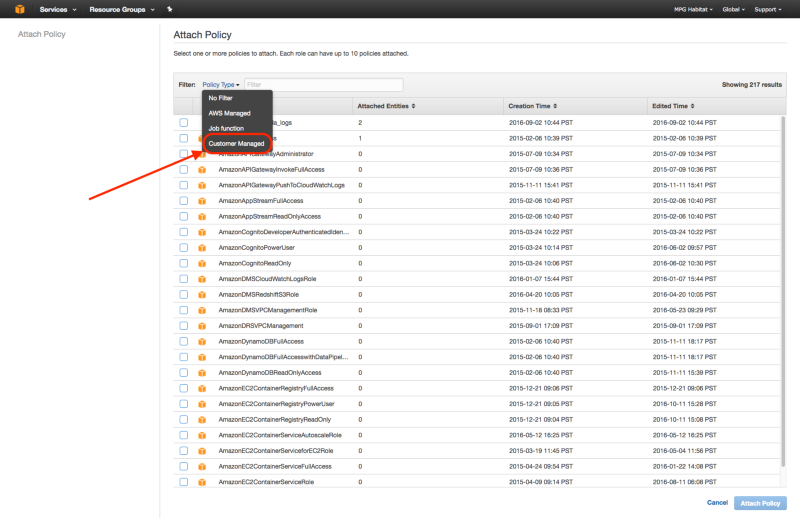
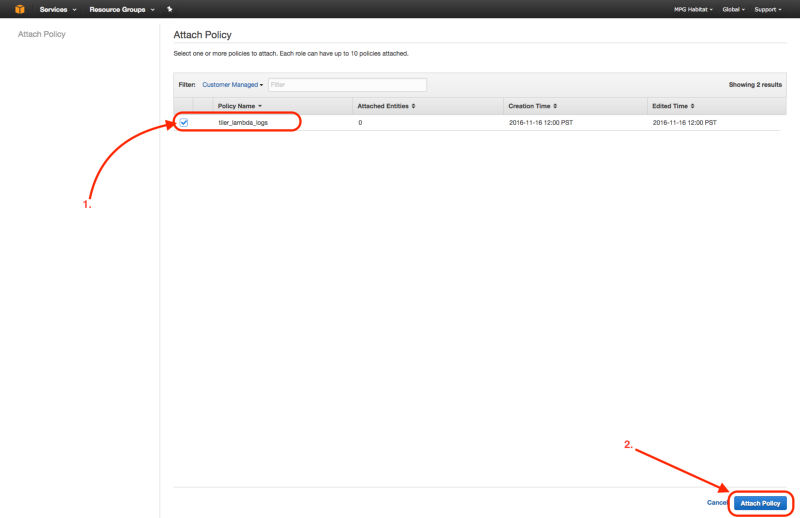
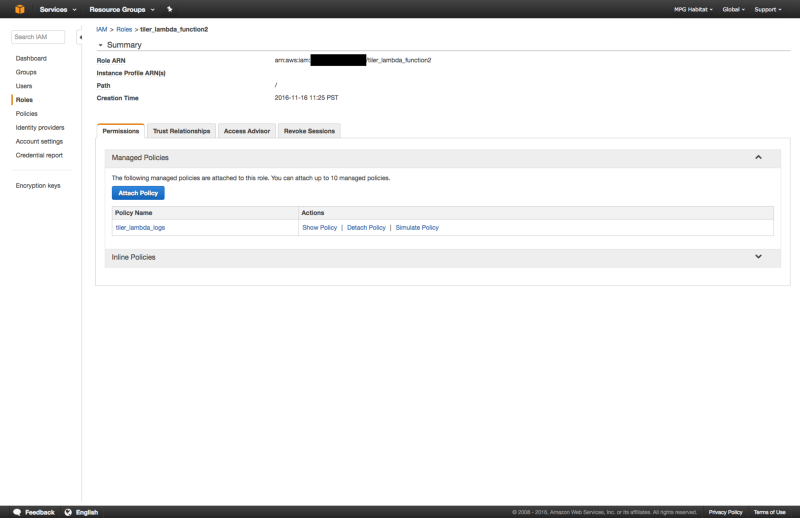
3. Attach Logs Policy
Attach the above policy to the tiler_lambda_function IAM role as follows:
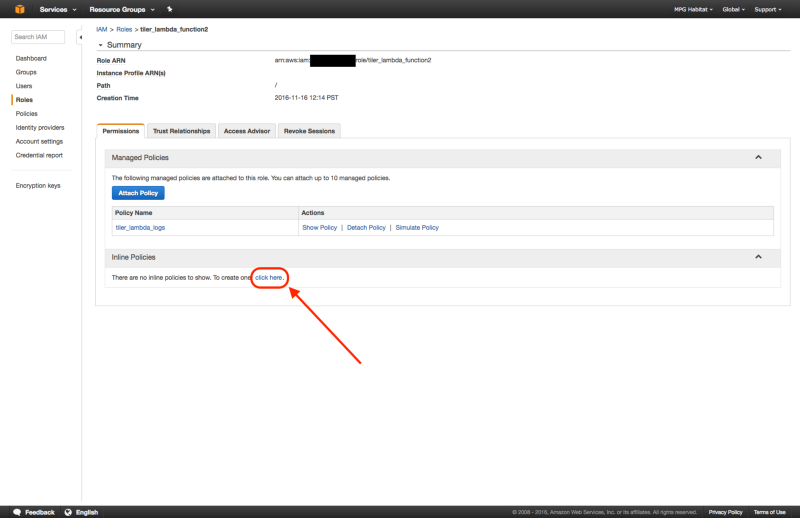
4. Create Inline Policy
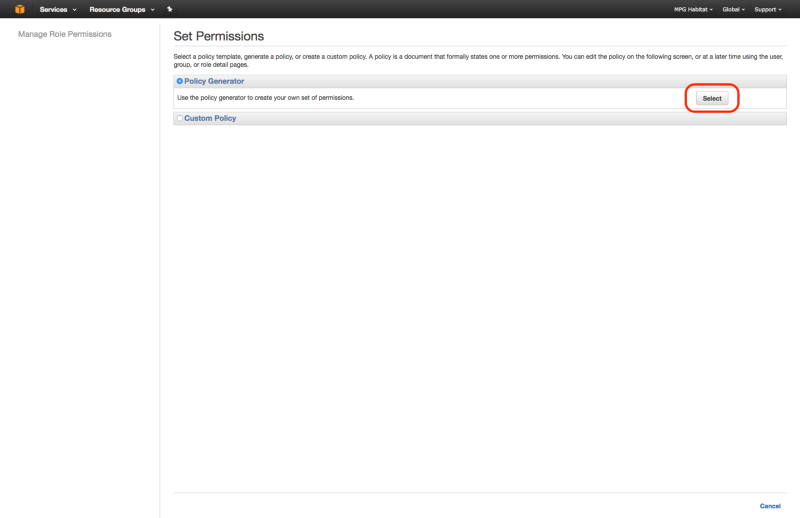
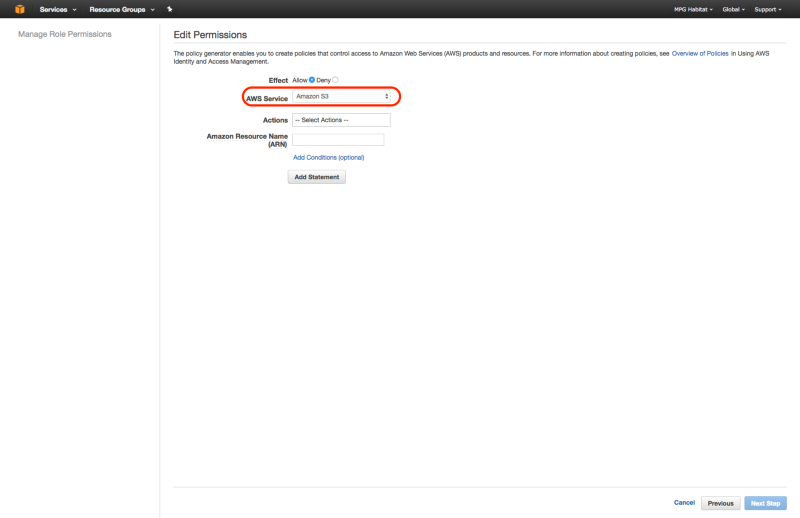
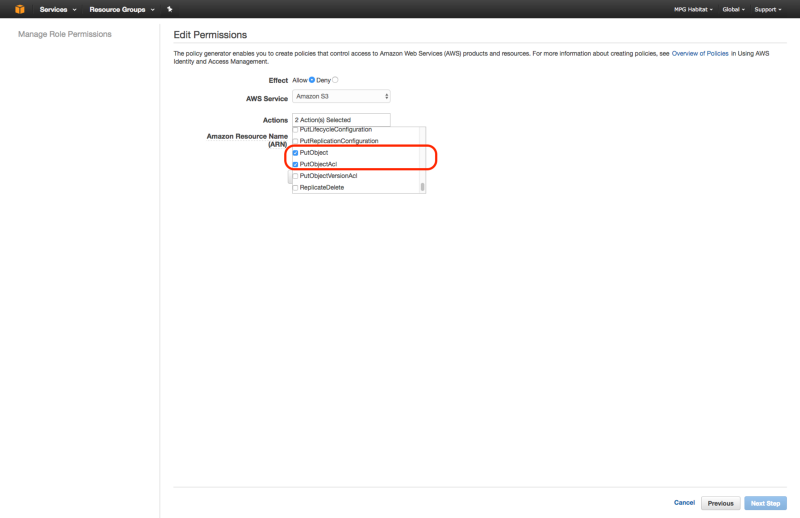
Now create an inline policy to allow tiler_lambda_function to write to S3. You can do this by going to “Create Policy” , then “Policy Generator”, then checking “allow”, selecting “Amazon S3” as the AWS Service, checking “s3:PutObject” and “s3:PutObjectAcl”, and then entering the ARN number as follows: arn:aws:s3:::your-s3-bucket-name/*
Here is a walk through of the process:
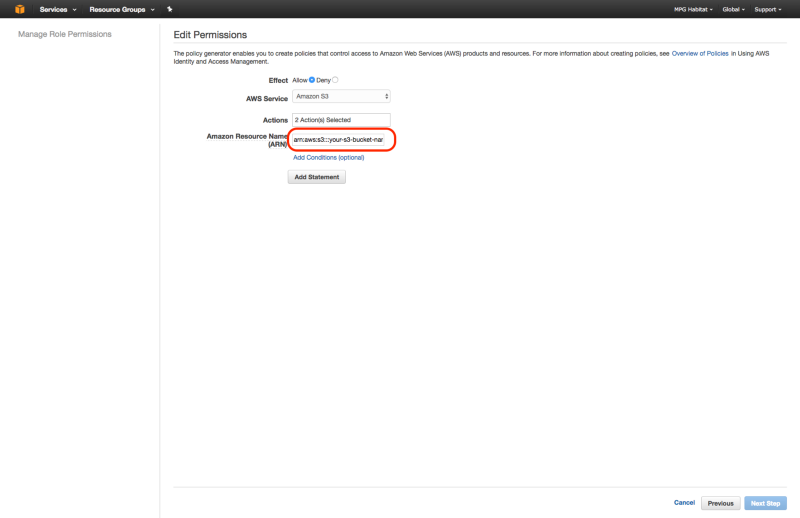
arn:aws:s3:::your-s3-bucket-name/*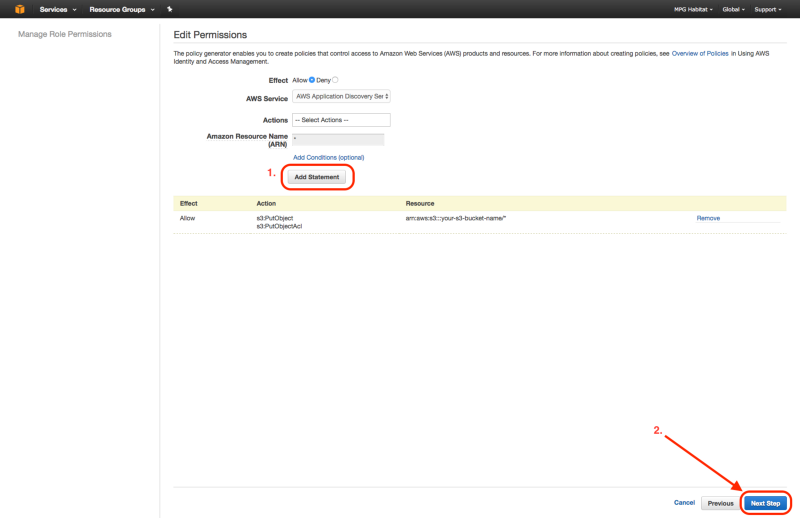
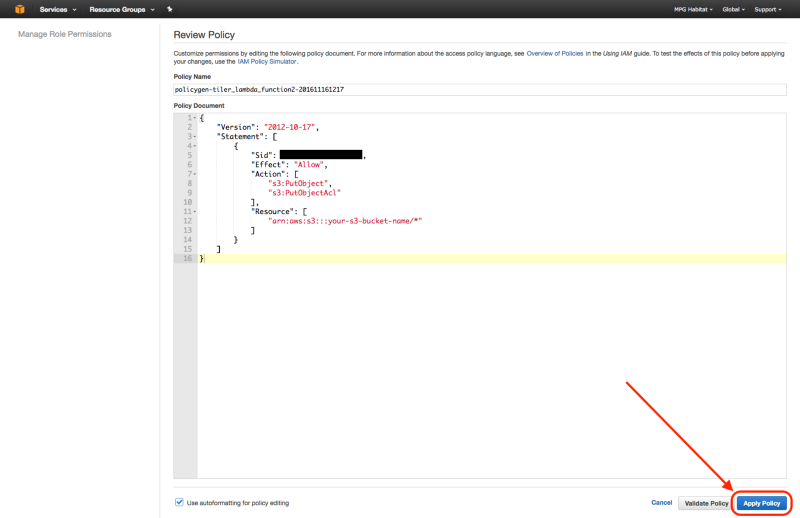
The inline policy should end up looking similar to the following:
{
    "Version": "2012-10-17",
    "Statement": [
        {
            "Effect": "Allow",
            "Action": [
                "s3:PutObject",
                "s3:PutObjectAcl"
            ],
            "Resource": [
                "arn:aws:s3:::your-s3-bucket-name/*"
            ]
        }
    ]
}
Deploying to Lambda via Apex
We can now deploy our functions from the OAM Dynamic Tiler repo to AWS. Make sure you have Apex installed. You will also need to have Docker installed and running.
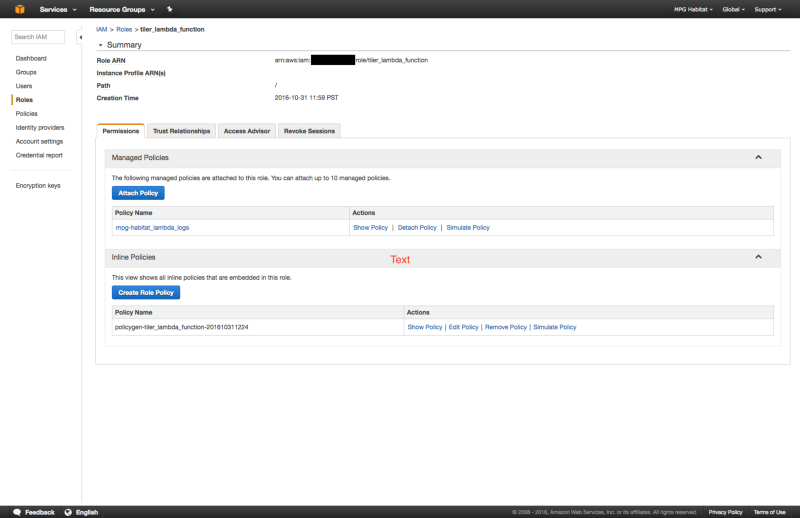
Back in the OAM Dynamic Tiler repo, update project.json with tiler_lambda_function role’s ARN (the “XXXXXXXXXXXX” in the following code snippet) and your S3 bucket name. The ARN number can be found by viewing the role’s summary page. It is the number which is blacked out in the previous section’s screenshots.
{
  "name": "my-project-name",
  "description": "Dynamic tiling of raster data",
  "memory": 1536,
  "timeout": 5,
  "role": "arn:aws:iam::XXXXXXXXXXXX:role/tiler_lambda_function",
  "environment": {
    "S3_BUCKET": "my-s3-bucket-name"
  }
}
Run apex deploy from the root of the repo. You may add the -l debug flag to see what’s running. This will build the Docker image defined in deps/ to produce a task.zip containing binary dependencies needed when deploying to the Lambda runtime. Note that the use of Docker to produce binary dependencies works, but is still a little rough around the edges. Seth and I would love to hear from you if you have advice on this part!
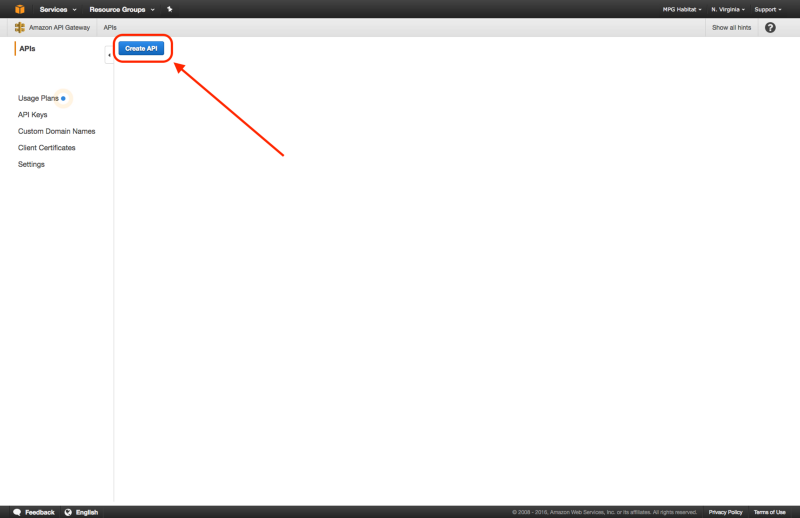
Create API
Okay, we’re getting close! Next we’ll use a swagger.yaml file to create a new API via the AWS API Gateway.
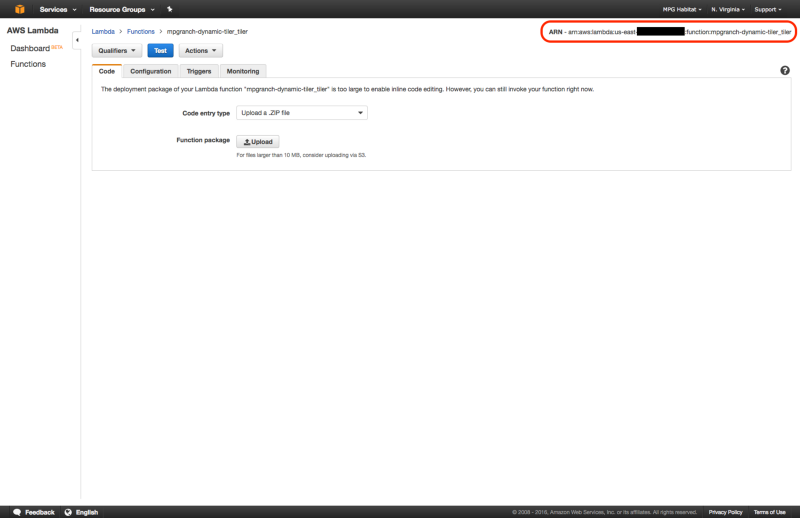
Assuming that apex deploy went well, grab the ARN generated from the Lambda function. This can be found by going to AWS Lambda and selecting the function created by running apex deploy. It will appear in the upper right corner of the page.
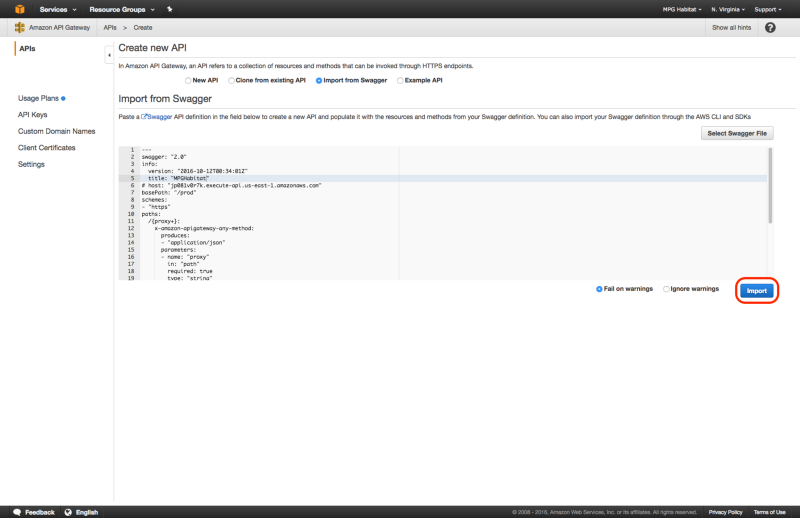
Then edit swagger.yaml in the OAM Dynamic Tiler repo. There’s a line that looks as follows:
uri: "arn:aws:apigateway:us-east-1:lambda:path/2015-03-31/functions/arn:aws:lambda:us-east-1:XXXXXXXXXXXX:function:my-project-name_tiler/invocations"
You will want to splice in the ARN from the Lambda function between
"arn:aws:apigateway:us-east-1:lambda:path/2015-03-31/functions/arn:aws:lambda:us-east-1:
and
:function:my-project-name_tiler/invocations"
Note that you may remove the host name and change the title if desired in the swagger.yaml file.
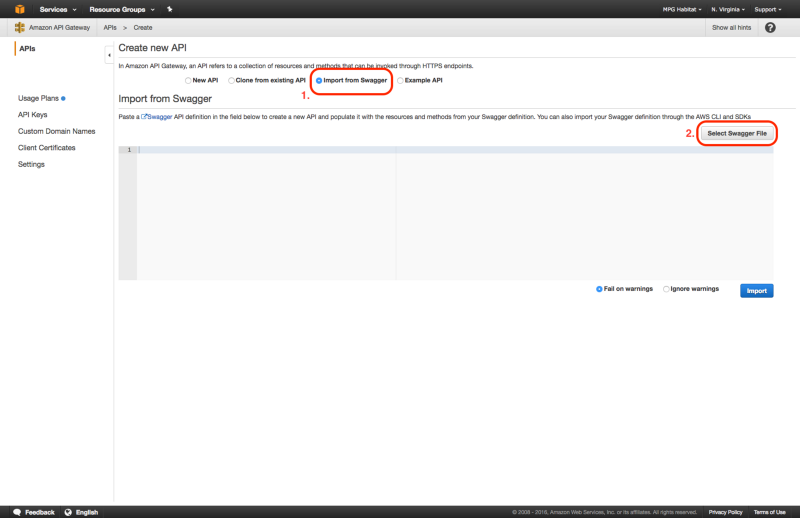
You may then use swagger.yaml to create a new API on AWS API Gateway by selecting “Import from Swagger” when creating the new API.
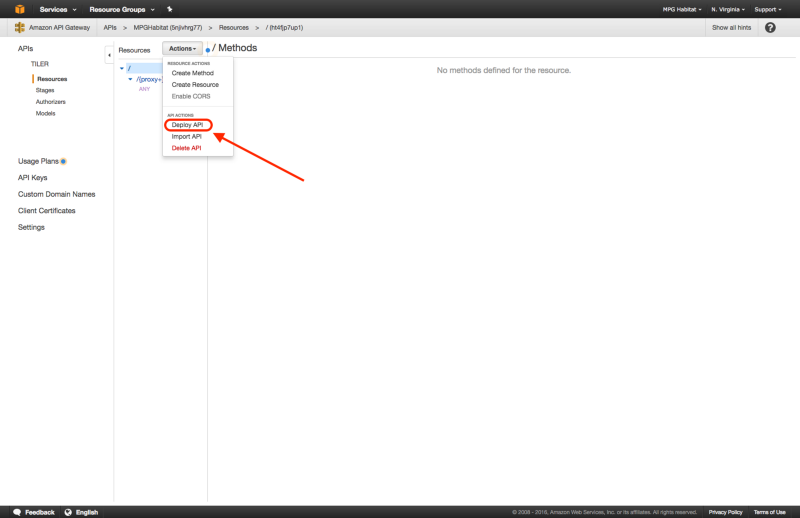
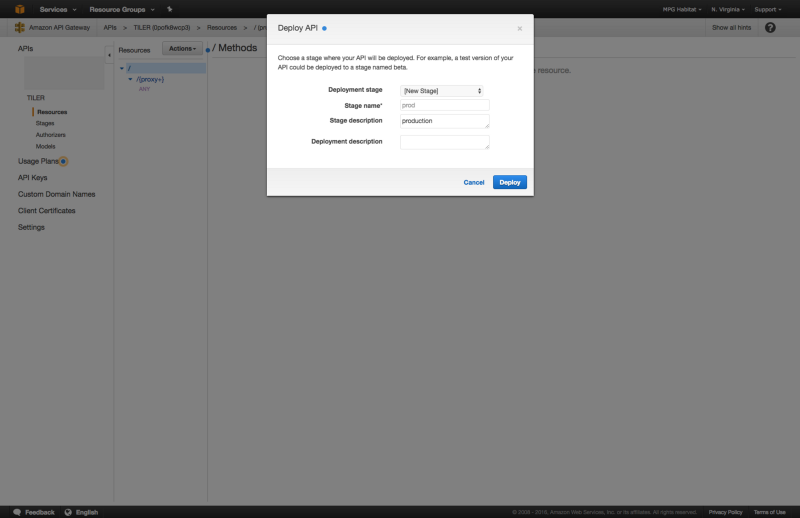
After the successful swagger.yaml import, you may now deploy the API by choosing “Actions” > “Deploy API”, selecting “new stage” for “Deployment Stage”, and giving it a “Stage Name” such as prod, and “Stage Description” such as production. If this doesn’t work try selecting “Create” within “Stages” and entering the same info.
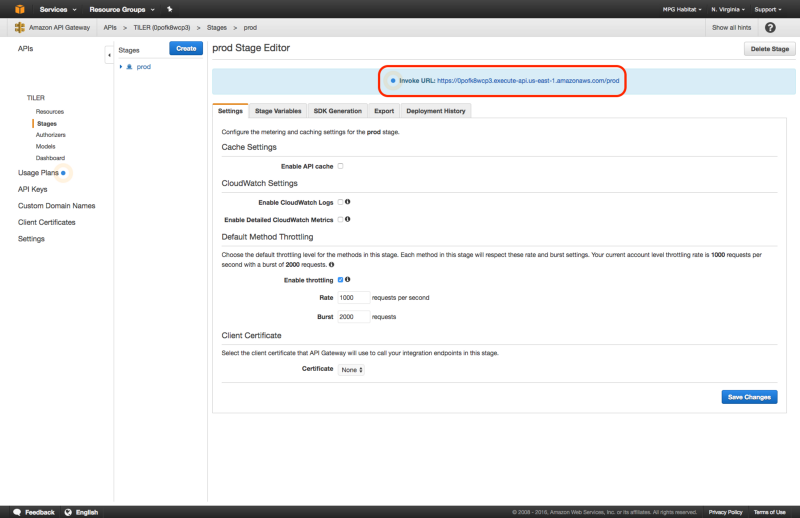
Following a successful deploy, in “Stages” you should see a “Invoke URL”, which will be used as the S3 redirect, minus the https:// protocol and trailing /prod part.
Here are some screen shots of the process:
Enable S3 Redirect
Now that we have our API deployed we can redirect HTTP requests to it from our S3 bucket. Back in your S3 bucket’s Properties check “Enable Website Hosting” and then open the “Edit Redirection Rules.”

Make sure that the XML markup for the Redirection Rules configuration looks like so. The line to edit is <Hostname>, for example, if the Invoke URL from the API we created in the last section is:
jp081v0r7k.execute-api.us-east-1.amazonaws.com
then your Hostname field will look like:
<HostName>jp081v0r7k.execute-api.us-east-1.amazonaws.com</HostName>
The actual endpoint for the /{z}/{x}/{y}.png tile url is listed as the S3 bucket endpoint. It should look something like:
my-s3-bucket-name.s3-website-us-east-1.amazonaws.com
Note that your S3 bucket will now have two URLs: a website enabled bucket endpoint which redirects, and a vanilla bucket endpoint, which will return 404’s.
When requesting a tile via the following URL:
http://my-s3-bucket-name.s3-website-us-east-1.amazonaws.com/source_file_name/1/2/3.png
the request will be redirected. However a request to:
http://my-s3-bucket-name.amazonaws.com/source_file_name/1/2/3.png
will return a 404.
Remember that it’s important to make sure the IAM Role for the Lambda function has the correct inline policy attached allowing it write to your S3 bucket, as this is where the tiles will get written.
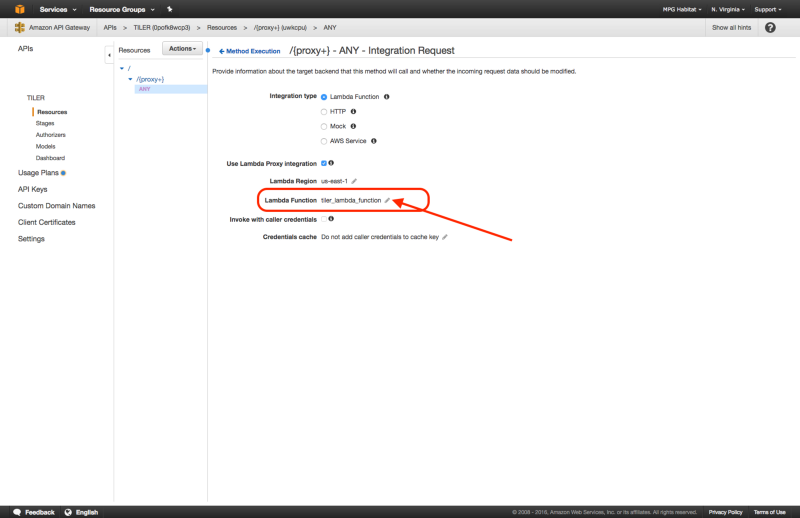
Grant Access to API Gateway
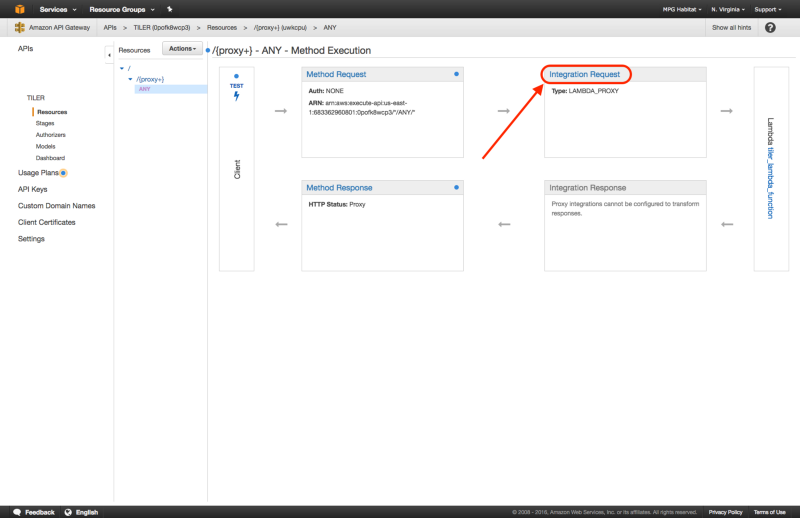
The last step is to grant access to our API. Return to the API that was set up in the API Gateway service. You’ll need to navigate to /{proxy+} > ANY > Integration Request. From here quickly edit and immediately save the Lambda Function in order to make sure the API Gateway has necessary permissions to invoke the Lambda Functions.
Test It Out
If you’d like to test the Lambda Tiler out locally, create a test-png.json with the following (swap out the {source_layer_name}, {z}, {x}, and {y} values for those of a tile that should exist):
{
  "path": "/{source_layer_name}/{z}/{x}/{y}.png"
}
Then using Apex do:
$ apex invoke tiler < test-png.json
You should see some output like:
{"headers": {"Location": "http://my-s3-bucket.s3.amazonaws.com/source_layer_name/17/24029/46260.png"}, "statusCode": 302}
You can then open that URL in your browser to see if a tile has been generated.
Debugging
After you’ve gone through all of this and you’re still not seeing any tiles render, you can view Lambda’s logs by doing:
$ apex logs -f
Viewing the logs while making requests to the tile URL can be helpful to determine if IAM roles and policies are incorrectly set, for example if Lambda has permission to write to your S3 bucket.
It will also let you know if permissions are set correctly on your index.* files in your s3-bucket-name/sources/layer_name/ directory. Remember that these files need to be able to be read by everyone. This is a common issue if you forget the --acl public parameter when copying files to your S3 bucket, you’ll see a “index.whatever does not exist” type of error message.
FAQ
Isn’t the hot new thing vector tiles? Why would I still want to use raster tiles?
Yes, vector tiles are all the rage these days, but there are still reasons why you might choose “old school” raster tiles over “new school” vector tiles. One is that vector tiles require using WebGL, a technology that works on newer computers and browsers. If you need to support older computers or have other reasons for avoiding WebGL, raster tiles are a great solution.
You can also use this workflow to render fallback (raster) tiles from vector tile sources. The Terrain Classic implementation renders from a PostGIS enabled Postgres database, but it doesn’t have to.
The AWS configuration sounds like a headache! How is this any easier than setting up a tile server?
It’s true, it’s fairly tricky to get the AWS services, IAM roles and policies set up correctly. However, once you are up and running, adding additional raster layers only requires data processing and adding the aforementioned files to the appropriate directories of your S3 bucket. Once you have those directories and files in place you should be able to point to the tile URL for any layer without having to do additional IAM or Lambda configuration.
How can I use this process for tiling vector data, like that from OSM, Natural Earth, or Vector Map Tiles?
As this post has already gotten fairly lengthy, the answer to this question will be the subject of a follow up blog post! For the Terrain Classic map tiles we use Mapnik and Tessera, but more on that later.
I have some ideas for how to improve this workflow, may I leave feedback?
Please do! This is still a process that is a little rough around the edges and that we are working towards refining, so any suggestions for improvements are totally welcome. You can leave comments below or reach out to me personally (chris [at] stamen [dot] com).